
While there are many different designs and concepts behind loading a pack, they all have one constant in common, the forces of gravity. By exploring the numbers behind how a pack is loaded, we can see how to minimize the overall effects of gravity on the long haul out.
Two of the major forces acting on our bodies under a loaded pack are the actual weight of the load, and the leverage that load exerts on our body. While we cannot change the actual weight of the load we need to carry, we can manage how much leverage that weight creates. Generally speaking, this is felt as leverage pulling us back, causing us to lean forward and engage our core to maintain balance. This added force can be as high as 40% of the total weight on a poorly loaded pack, and even more on a pack frame with short or no load lifters. This extra leverage also makes the load more unstable and requires more effort to remain balanced and in control. In technical country where every step counts, or while on crampons, it can also add an unneeded degree of risk.
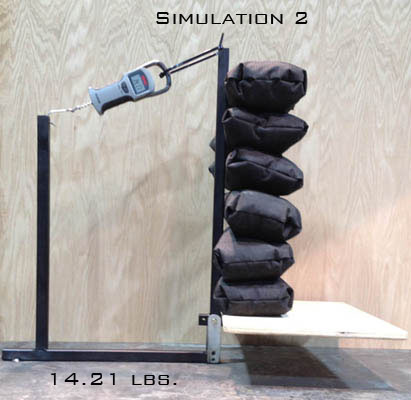
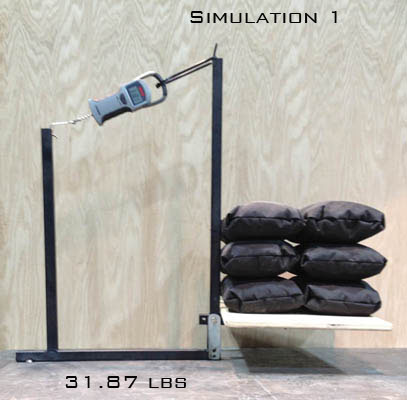
While it is hard to put an exact number to the additional force created, we built a jig to better test and understand the mechanical advantage. The jig simulates a 25” tall pack frame with a base 12” wide by 11” deep, the average size of many 6000 cubic inch bags. To simulate the fulcrum created at our lower back with a loaded pack, the frame pivots at the hipbelt area and has a scale attached to the load lifter to record the force. There are 6 sand bags with a combined weight of 76 pounds.
The first photo simulates loading the meat the full dimension of the bag bottom, the second simulates loading the meat in a shelf and compressing it to the frame. Simulation #1 generated 31.87 pounds of force, Simulation #2 with a shelf configuration generates 14.21 pounds. So with 76 pounds of meat, an extra 17.6 pounds of force is created on your body simply by how the pack is loaded. Loading the pack vertically and minimizing the horizontal distance between the load’s CG (center of gravity) and our body’s CG is the key. This also demonstrates the function of a load lifter. As the frame height and load lifter height decreases, the mechanical advantage to offset the leverage of the load also decreases.
Based off this simulation, a 25” load lifter height can provide 25% more lift/leverage than a 20” frame. This is often the difference between what some call a “functional load lifter”, and a “load stabilizer.”
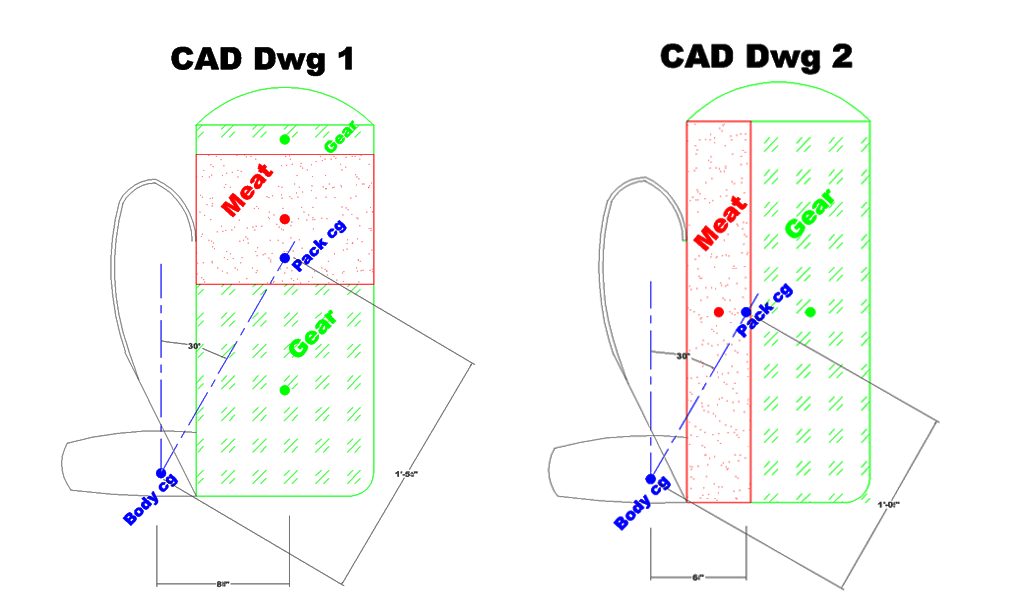
I have calculated that when loaded (sheep/mule deer size animal) and camp, approximately 70% of the weight (meat) uses 35% of my cubic inches. Based on this, both 6000 cubic inch pack drawings below are drawn to scale to represent the needed location of gear and meat to minimize the angle and horizontal distance between our body’s CG and the loaded pack’s CG. Each colored dot represents the CG of that portion of the load. The blue dots represent the combined and true CG of the entire loaded pack.
CAD Drawing #1 shows meat placement in a standard pack configuration. By elevating the meat on the frame, we reduce the angle between the body’s CG and pack’s CG (30 degrees in this drawing) compared to loading the meat at the bottom of the bag. The closer we come to aligning the body’s CG and the pack’s CG vertically, the more we reduce the effects of felt leverage and the less you have to lean forward to compensate. Unfortunately, this meat placement option requires packing boned meat on top of your gear, so any shift in the gear allows the meat to migrate lower thus lowering the CG angle, increasing leverage and reducing overall load stability. This usually occurs over longer duration pack outs when you’re fatigued, exactly when you want the load to be the most stable. This also requires meat to be packed in a water tight bag to prevent leakage onto the supporting gear, which presents another set of issues in warm weather and/or longer trips out.
CAD Drawing #2 shows how a pack would be loaded in the shelf configuration to accomplish the same angle but with a significant reduction in leverage and significant increase in load stability. While both are functional options, the load shelf configuration in drawing #2 moves the pack’s CG 30% closer to the body’s CG in comparison to the standard pack configuration even when the meat load is elevated. Proportionally, the load shelf will equate to a reduction in leverage when compared to Drawing #1 in this example. This also lowers the center of gravity to attain the same angle. This creates less leverage horizontally, for example when leaning sideways or leaning forward to navigate terrain. While there are many more forces and vectors at work in these examples, this simplistic view shows the importance of load location.
Compression is a necessity to reduce meat migration. If the load does not stay in place and shifts to the bottom of your pack, the effort to pack the same amount of weight has increased substantially. With load shift also comes a loss of stability. The load shelf is a load positioning system that provides the needed compression to keep the dense portion of weight in place thus reducing excess effort.
Additionally, a major point is placement of horns/skulls. When adding very dense loads, especially sheep horns or any skull with cape, loading at the top (i.e. under the lid) of the pack, as close to the frame and back as possible will keep any increase in leverage at a minimum. The general rule I use is to load gear diagonally lightest to heaviest, from the bottom outside of the bag to the top of the frame while keeping the heavier items as close to the pack frame as possible.
Whether you’re dealing with a 3-hour pack out, or 3-day pack out, the extra force created by a poorly loaded pack can increase the effort required substantially. An ultralight pack’s weight advantage is not realized if not loaded properly. Hopefully exploring these topics can help make your pack set-up work the best for you so the loaded trip out is as comfortable, stable, and safe as possible.
Best of luck this fall and don’t hesitate to email me personally with any questions you may have regarding pack design, fit and the testing we’ve done on load management.
Kurt Racicot