How important is your bow sight to your hunting capabilities? I am not one of those people that believe better gear makes you a better hunter, but I do believe that your gear needs to hold up to the abuse of the backcountry. My sight would be the one component of my archery set-up that I definitely wouldn’t skimp on. But, why? You can use any sight effectively if you can hold the pin on it, right? Well, not exactly. If you’re just shooting at a bag target in your yard, you can get away with just about any sight and shoot effectively. When you add the brutal steepness, weather and unknown of what you may encounter in the mountains, you need to look beyond the pins.
With that being said, what components are important for a hunter to consider when looking at their bow sight set-up?
First, I look at the construction of the sight. I know that my bow is going to go through the ringer on backcountry hunts, and my sight needs to hold up to this abuse. I look for a solid aluminum construction from the sight housing to the mount, and every part in between. Any plastic parts are almost guaranteed to break after enough time in the field. Whether it’s going through thick brush, bumping up against a rock or dropping your bow, plastic components are not going to hold up. The downside to having an all aluminum sight is the additional weight. But, this is a minor downside compared to the upside in durability. If you find a bow sight that is completely aluminum, it will mostly have the ability to adjust your second and third axis, which I’ll get into next.
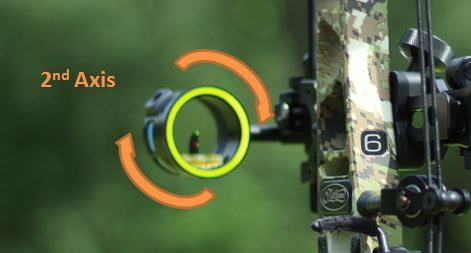
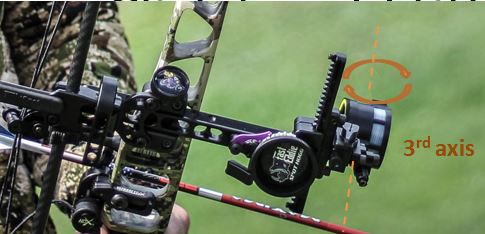
The second component that is a necessity for any mountain hunter (or tree stand hunter) is properly adjusting their second and third axis. The first axis adjustment simply refers to aligning your mounting bracket with your bow riser. You won’t need to worry about this with most fixed pin sights, as it is fixed to the bracket. The second axis would be the rotation of the sight housing and pins. Lastly, your third axis is the angle of your sight housing in relation to your riser. Think of this axis as your sight housing on a door hinge. Instead of going into details on how to adjust these, I want to talk about why they apply to hunting scenarios from east to west.
Before I started working at an archery pro shop, I would just mount my sight on my bow, sight it in, and shoot it. I’m not a target archer, I am a hunter. After I broke down my personal mental walls and realized that having your bow components tuned correctly makes a significant difference, I started doing some testing. To speak specifically on the second and third axis adjustments, I mounted my sight and started shooting in my back yard. 20 yards, perfect! 30 yards, pretty good! 40 yards, a little to the right, but not bad! 50 yards…umm 10 inches to the right isn’t bad, right?
I just paid a lot of money for this sight, but why can’t I shoot it well? The arrows that veered to the right were the result of my second axis not being adjusted correctly. After rotating my sight housing so that it is truly level, I brought those groups into the center out to 60 yards. This is where most people (and many sights) end with adjustability. After shooting some more I had no issues, until I started practicing out of a tree stand. When I would start shooting at steep angles, my groups would fall off to one side.

Immediately, I thought my form was off, which of course can be an issue, as well. Once I realized that my form wasn’t to blame, and still was hitting off to one side, I knew that there was an underlying problem. I was talking to another bowhunter about my struggles, and he asked if I’d adjusted my third axis. I told him that I hadn’t, and didn’t know how to. At the time, there were limited resources and articles available to reference on adjusting my third axis. Many sights don’t offer an adjustment for the third axis, but luckily mine did.
He had me find a perfectly straight vertical line that I could draw back on and follow my pin up the line. I used the corner of my house, but take extreme caution with this for safety reasons. In addition, make sure that the house is perfectly square. As I was at full draw, following the pin up the corner of the house, I noticed that my sight level started falling off to the left side. My bubble wasn’t reading true due to the angle that the sight housing was facing my bow. Remember; think of this as a door hinge. Once my third axis was properly adjusted, I climbed into the tree stand in my yard and starting shooting at different yardages and angles. I couldn’t believe the difference that this made!

Since I have become aware of my different axis adjustments, I make sure that this is the first thing that I do when setting up a new bow or sight. I now complete this step prior to sighting in my bow. Over the last couple of years, I have been attending the Total Archery Challenge events at the Seven Springs Ski Resort in Pennsylvania. These courses have extreme angles meant to mimic real hunting scenarios while hunting in the mountains or from a tree stand. It wasn’t hard to see which archers didn’t adjust their axis or weren’t aware that they could. You can find specific how-to videos for almost any sight on YouTube on how to get your bow sight tuned correctly.
If being in the mountains chasing your species of choice is on your mind 24/7, and you spend countless days preparing for that one moment, do yourself a favor and be ready for that opportunity. I would rather buy tags over gear any day, but purchasing and properly setting up a reliable sight is a worthwhile investment. I have used Spot Hogg sights over the past few years, and they are bulletproof. Other notable sights known for their durability and adjustability are HHA sights. My Spot Hogg Fast Eddie XL sight has been with me through the Rocky Mountains and into a tree stand in the Appalachian Mountains of Pennsylvania without failure. There are countless things that could lower your odds of success on a hunt, don’t let your bow sight be one of them.