
With the wide variety of rounds available on the market today one would think that there is a round for every need and for every purpose. While this is true to a certain extent, wildcatting is still alive and well today for a number of reasons. Various wildcats have been developed over time all with the same goal in mind, to increase performance and/or fit a certain amount of performance into a certain platform. Let’s take a look at the more common ideas and techniques of wildcatting cartridges.
Necking up or down
This is probably the simplest form of wildcatting and is simply taking a given case and running it into a die to change to a different bullet diameter. There is no fire forming, no muss no fuss, dirt simple. Some good examples of this are, the 22-250 Remington (a 250 Savage necked down to .224”), the 17 Remington (a 222 Rem necked down to .172”), the 25-06 (obviously a 30-06 Springfield necked down to .257”) and the 338 Edge (a 300 RUM case necked up to a .338”). These are just a few of the many cases that have been “wildcatted” and gained enough following to become a full factory round or have a factory round like status.
Improving cases
Case improvement almost always involves some kind of fire forming. PO Ackley did extensive and detailed work on this. In Ackley’s work, most of the cases had straightened out some of the case body taper (but there are limits) and changed shoulder angle. Ackley came to believe that .010” per inch of case body taper was about the maximum you could do before the brass started having extraction issues. Ackley also felt that 40 degrees was about the steepest shoulder that showed any reasonable improvement. The .010” per inch case taper and 40 degrees shoulder have been wildcatting standards for decades and hold well today. One of the better examples of case improvement is the 280 Rem Ackley Improved, it very nearly duplicates the 7 Remington Magnum’s ballistics out of a much smaller case. Nosler liked this round enough that they released it in a commercial version several years ago. A very popular varmint case is the 22-250 Ackley Improved, duplicating the 220 Swift’s performance in velocity. True improved cases were initially designed to have a standard loaded round fired in an improved chamber to form brass. Nowadays most case improving is done via a small charge of pistol/shotgun rate powder and the rest of the case topped off with cornmeal.
Moving shoulders forward or backward
In an effort to gain capacity or to shorten a cartridge for a certain action type the wildcatter might need to move the shoulder location. For those interested in moving a shoulder forward to gain case capacity caution must be exercised here as too steep of a shoulder angle coupled with a shorter neck can cause serious premature throat erosion. For the most part unless a case has an unusually long neck I recommend against moving a shoulder ahead very much. I do move the shoulder ahead on certain rounds to prevent them being chambered in a similar chamber, this is one of the practices that you see for example in the WSM cartridge line. The 7 WSM is just enough longer in the shoulder to base (head space) to prevent accidental chambering in say a 300 WSM chamber.
In shoulder moving, the most common practice is moving back to create a shorter round. The 300 RUM case had been on the market for a very short time (maybe a day or 2, wildcatters are like that) before someone started shortening them up. This is the most complicated version of wildcatting so we will spend some time here to see what is involved.
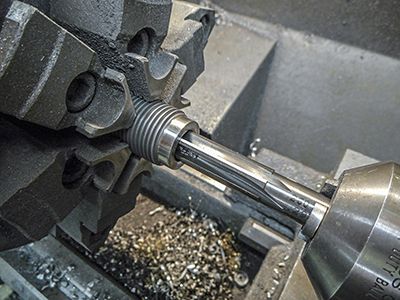
In the lead photo you will see the whole series it takes to make a 6 UVC out of a piece of a 300 RUM casing.
The first thing is to move the shoulder back in 8 steps of about .070-.040” each step. Once the shoulder is moved back and the neck sufficiently small for the caliber you take the brass and trim to just longer then the length you need. With the excess brass gone we expand the inside of the neck to the proper diameter so that we can turn the outside of the neck to the proper dimension. With all neck dimensions on point the case gets the final trim to length. Once this is done it is ready to be fire formed with our load of pistol powder and cornmeal. This short paragraph doesn’t do justice to the amount of work that is required to build brass this way. This is a serious undertaking and one I would caution the novice wildcatter about wading into. Unless you have some tool & die back ground or an extra pile of money around this is an expensive and time consuming way to build a wildcat, but it is also the best way to get something really unique.
Miscellaneous design considerations
First of all you need to be serious about the reasons you want to build a wildcat. Do you need a certain bullet/velocity requirement? If that is the case there is probably already a round that fits your needs pretty well. If you need or want a round that fits a certain platform and delivers a certain amount of performance you may need to build your own round. The last reason that comes to mind and I think this is the most popular is the, “I just want to be different” round. Let say for one or all of the reasons above you need to develop a new round, I will take you through the entire process I just went through on my last wildcat.
Building a new round
I found myself looking at a set of requirements that I could not find a suitable round available for. My requirements were this:
Must be .264 caliber
Must be able to cycle through a detachable box magazine on a 700 style platform
Must be supremely accurate above all else
Must be a substantial increase in performance over the standard 260 Remington
Given the standard performance of the 260 Remington (2775 fps with a 140 Berger), I set out to top that by quite a bit while staying within the parameters above. Step one is to get some estimations of performance, I used the Quickload reloading program for this. I have used Quickload for several years and found it to be a great guide on these projects. , first changing the shoulder angle measurement form 20 degrees to 35 degrees. I then changed the body taper to the standard .010” per inch taper. While I was at it I moved the shoulder forward .010” to prevent anyone from accidentally getting it into a 260 AI chamber (although this was highly unlikely). I weighed a standard 260 Rem case and entered the weight as this would be the parent case and proper weight. Quickload gave a H2O capacity change from 53.5 grains to 59.9 grains, now this may not seem like much but sometimes wildcatting is not always about how much of the same powder you can get in the case, but more about what other powders I can now look at with more beneficial burn rates. Quickload initially estimated that with RL 26 powder that velocity with the 140 Berger bullet set to magazine length would be right around 3028 fps. This was starting to look like a promising project, a PRS rifle that would feed from a mag, have about 250 fps over a 260 Rem and even a little over a 6.5-284 that wouldn’t fit in the magazine anyway.
With case specifications set, the next step in the process is to design a properly dimensioned reamer set. Now people have their own ideas here about what needs to happen for optimum accuracy in terms of reamer dimensions. Keeping in mind this is a field rifle and not a benchrest rifle I did not want a tight chamber especially in the neck, not a fan of tight neck chambers. I allowed for .004” at the web of the case, a lot of people go tighter claiming less work hardening and more accurate round orientation but I like easier extraction especially on a race gun. I went .006” diameter on the body at the shoulder allowing for normal expansion / contraction and room for full length resizing. I also went .006” on the neck diameter. Now there are a number of people that swear up and down that running only .002” on the neck is “the” key to accuracy, but we have not had an issue getting great performance out of a little more tolerance. The last tolerance to set is the oal with a selected bullet, this is easy. I take the parent case and seat a bullet to the desired depth, in this case 2.820” with a 140 Berger Hybrid Target, and send a dummy round with the requested reamer print. While we are at the junction of reamer design you will also need a full length sizing reamer to make a reloading die with. Again this is a field rifle and chambering and extraction must be flawless, so having a reamer made to size the brass back to the original dimensions (smaller than the chamber reamer) is a must.
With reamers ordered there are some more parts to acquire now, I had a left handed Remington 700 receiver with no home and I hate that so it was put into the build box. I ordered a 24” Hart Sendero profile fluted .264” 1-8 twist barrel blank for the project. I wanted to try one of the Gunwerks stocks with its slimmer profile so I called Aaron and got one coming my way. Now with all the major parts on the way I just have to wait.
Now while patience is a virtue, it is not one of mine. So when the reamers show up I am pretty wound up to get going on the project. I start projects like this by getting loading equipment and brass built first. I learned the hard way about building a rifle that I later could not build brass for early on. I like the Newlon die blanks and use them a lot. Taking a .264 blank and using the resize reamer I built a full length, neck bushing die. The Newlon blanks take standard ½ in bushing like the Redding bushings. Next I take an old barrel or even a piece of stock to make a fire forming barrel stub. This stub fits the action like a barrel and allows me to form brass without additional wear to the rifle. With a working FL die and dummy chamber in hand it was now time to build some brass. The first step in building brass that has a relocated shoulder is to create a false shoulder so that the case is held tight in the chamber during fire forming. If this is not done you can ruin brass and even rupture cases due to excessive headspace. This is done by necking the diameter up, in this case to .284 (I simply ran the 260 Rem case into a 7-08 die to expand the neck. Now take the expanded brass and run it into the full length die you made until it just fits your dummy chamber snugly.
The brass is now ready to load and fire form. Having some experience here I knew what kind of a load I would need. If you do not, you need to work up a load just like a normal round starting low and working up to a fully forming round. I used 15 gr. of Winchester Super Field and topped the rest of the case off with cornmeal. Then push a paper patch into the top to keep it all snug. Take care not to shake the case around while putting the cornmeal in and mixing it with the powder. Now you simply fire this load in the forming chamber and behold a new cartridge. I like to check the brass dimensions now to see if it looks like it is going to fly. With all dimensions appearing to be in order and brass building squared away, I barrel the rifle up with the chamber reamer. Essentially the project is finished from a build perspective; all that is left is standard load development. Quickload is very valuable in predicting starting loads for cases that don’t exist.
I won’t bore you with all the load development details, but my original 260 load was 43.0 gr H4350 with the 140 Berger and a velocity of 2775 fps. The new case using H4350 ran right at 2860 fps for almost a 100 fps increase. In my mind this would not have been worth the extra effort, however as you change case capacity it will, as I mentioned earlier, allow you to look at different powders. These powders that you couldn’t get enough of in the case to work before are now the shining stars of your new wildcat. Looking at the Reloader 26 powder and working up that load, we got 3014 fps. This made the Quickload predictions very accurate given that there are a lot of variables that you cannot account for. So the project is a success, it meets all the requirements of velocity and accuracy. It cycles from the detachable magazines and is a substantial step up from the 260 Remington. The only thing left now is to name it.
Editor’s Note:
We’d like to thank Gunwerks for allowing us to re-publish this piece that originally appeared in their Long Range magazine.