Weight reduction is one of the primary objectives of the dedicated mountain hunter. With this in mind many people sacrifice certain “luxuries” when heading into the backcountry. Two luxuries I personally refuse to leave behind are a good single malt scotch and a proper cup of coffee – weight be damned!
Yes instant coffee has come a long way and in a pinch Starbucks Via gets the job done. But no matter how far instant coffee has come, it’s still a far cry from a proper stand your spoon in it, kick your ass up the mountain cup of coffee. There are numerous backcountry coffee set-ups available, most however are bulky, heavy and a pain to clean. My personal preference for brewing quality coffee in the wild is a simple collapsible silicone filter set up. All you need are No. 2 single-use cone filters and a good, strong coffee ground medium-fine. Gravity will do the rest!
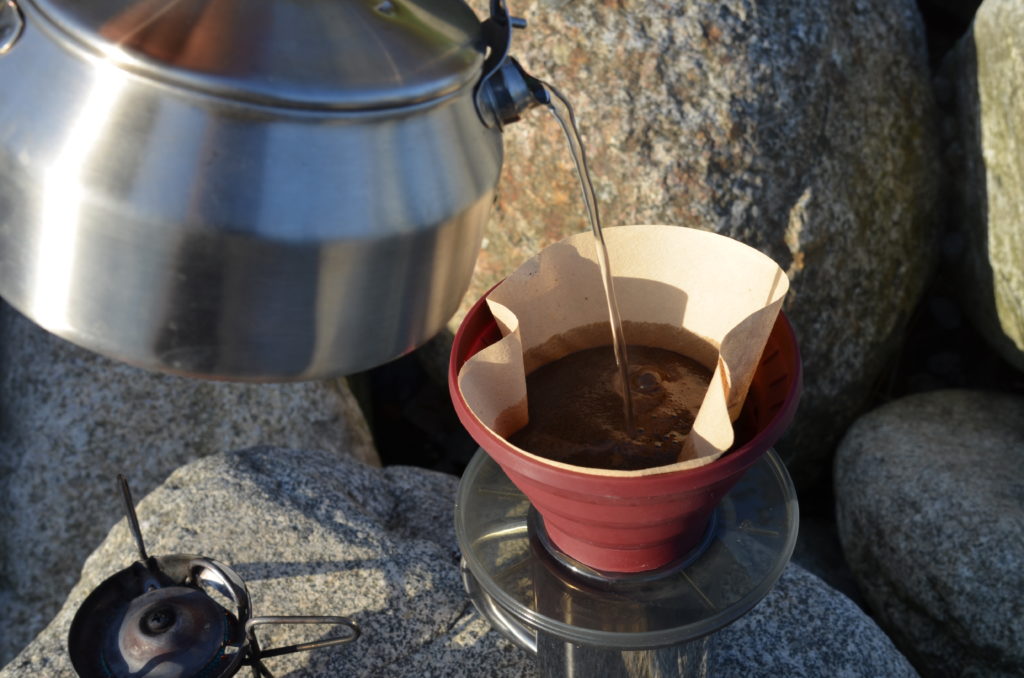
 The collapsible filter I use is made by GSI outdoors and weighs in at 100g or 3.5oz without the additional cover, which in my opinion is not necessary. Each single use paper filter is 1g. To make a strong 12oz cup of coffee you will need 20-25 grams or roughly 4 tablespoons of ground coffee. If you’re a coffee person like me, buy the best coffee you can. To make the coffee simply boil some water, set the cone and paper filter with coffee in place over your mug and slowly pour the water over the coffee in a circular motion, soaking the coffee grounds. If you pour too fast the coffee will clump together and the water will pass through the grounds and filter without proper retention time with the coffee. A nice, slow pour will ensure a deep, dark mountain worthy flavour.
I like to pre-heat my mug with a bit of hot water as most double walled stainless steel mugs will steal a good deal of the heat from the coffee when cold. If you want your coffee hot to the last drop I strongly suggest doing the same. If you’re rationing water in the high alpine however, simply put your mug in your insulated jacket pocket while you wait for the water to boil. This will warm the mug sufficiently as well.
Once your mug is full you’re done! Simply lift the filter set-up off your coffee mug and set it aside. I usually discard the filter and grinds in the fire or in a hole dug with a trowel as the filter and grinds are both biodegradable. For a 10 day hunt, you can have premium quality coffee for around 350g or 12.5oz on top of your already packed stove and mug. In my opinion, it’s worth every extra bit of weight. A good, strong cup of coffee can start your day just right and when hunkered down in bad weather there are few things that warm the soul like a nice cup of coffee.
Now as far as the scotch goes, that’s a whole other story. Needless to say, there are certain moments in a hunter’s life that simply demand the respect that a two-finger pour of single malt can only achieve. For me, hunting is all about the experience, the time in the mountains or wilderness with good friends, and memories that last a lifetime. Those moments around the fire complemented by a smoky scotch are truly priceless. When not on a backpack hunt, I also like a “hard” coffee every now and then. The recipe I share below is not something you’d put together on a backpack mountain hunt but is very doable from a cabin, wall tent or similarly “luxurious” base camp. With this in mind, I’m going to share a recipe JOMH Editor Adam Janke and I call “The Wells Gray”.
 In November 2012 Adam and I were on a mule deer hunt close to Wells Gray Park in the North Thompson region of BC. The park protects most of the southern, and highest, regions of the Cariboo Mountains and covers 5,250 square kilometres (524,990 hectares or 1.3 million acres). It is British Columbia’s fourth largest park, after Tatshenshini, Spatsizi, and Tweedsmuir. The tag line for the park and the surrounding area (known as Wells Gray Country) is “The Canada You Imagined” as it attracts a lot of foreign visitors in particular from Europe. It is an incredible part of BC and a mix of everything that makes Canada the True North Strong and Free. This drink is named in honour of the peaks, meadows, lakes and rivers that make Wells Gray Country truly epic.
We were staying in a cabin on this trip and taking day trips into the mountains and backcountry in search of a meat buck or doe. After dinner one evening we felt like a warm “adult” beverage. Taking stock of our available ingredients we came up with “The Wells Gray”, a truly Canadian drink that is best served when there’s snow on the ground and a crackling fire close at hand. It is the perfect blend of smoky, smooth and sweet with a nice kick on the finish. If you’re looking for a warm adult beverage for the cabin, wall tent or home that is an ode to the fall and the wild places we all love to explore, we encourage you to serve yourself up a Wells Gray.
The Wells Gray
1 tablespoon full fat evaporated milk
1 tablespoon REAL maple syrup from Eastern Canada or New England – no Aunt Jemima fake shit, yes we Canadians take our maple syrup seriously
2 oz of Scotch – single malt best but in a pinch a blend or Irish whiskey will suffice
12oz strong coffee
Directions:
1) Pour maple syrup and scotch into pot and heat until warm (do not boil!). This is not an essential step and can be skipped but blends the flavours of the maple syrup and scotch into something truly special.
2) Prepare coffee as described above.
3) Once coffee is ready pour scotch-syrup blend into coffee and stir in the evaporated milk.
4) Sit back, relax, stroke beard and tell stories. Smoke pipe for full Canadian effect.