
Editor’s Note: We’d like to thank our friends at Western Hunter and Elk Hunter Magazines for allowing us to re-publish this incredibly comprehensive article from Nate Simmons. If you’re a diehard western hunter, WH and EH are two of the best print magazines available today. Nate also reviewed the best holsters for keeping your rangefinder accessible and ready at a moment’s notice. You can read his complementary piece to this article in this month’s Mountain Archer column.
A Practical Guide to Archery Specific Rangefinder Selection
Most bowhunters spend plenty of time on gear decisions, such as which bow, arrows, sights, and broadheads will be best for them. Bowhunting gear is important and exciting, but tools that I feel often get put on the back burner are rangefinders. It’s never been something I put near as much thought into as I do other archery equipment, yet I’ve found that rangefinder malfunctions (some of which are operator error) have caused me more lost opportunities than any other piece of gear I’ve used.
After going three consecutive seasons where a rangefinder was the main cause of having a hard-earned shot opportunity go awry, I decided to put more thought into the problem. The first issue I needed to deal with was figuring out if I was even using an adequate rangefinder in the first place, hence this review.
You should understand up front that what I’m looking for in a rangefinder is specifically for western spot-and-stalk bowhunting. There are many aspects I consider, and there isn’t a rangefinder I’m aware of that has everything I want. There’s going to be a compromise, and what’s important to me may not be important to every western hunter. The following is a list of the key features for my purposes.
Angle Compensation
This goes without saying, but angle compensation for bowhunting mountainous terrain is a must. Most rangefinders have this, but I like things to be foolproof, because there’s already so much to pay attention to that I don’t want to have to do math right before my shot. Rangefinders that prominently display anything but the angle-compensated “shoot-for” distance (horizontal distance) seem crazy to me.
I’m a fan of knowing both measurements, so I know what distance to shoot for as well as the actual line-of-sight distance — this way I don’t get a false sense of my effective range. However, some models make the prominent displayed number the line-of-sight, with the horizontal distance small and off to the side. Other models give you the line-of-sight number first and then, after a delay, swap out that distance with the horizontal distance. I don’t like either of these in critical situations.
Accuracy and Precision
This is comprised of a lot more factors than I once thought. Obviously, a rangefinder that gives consistent and accurate readouts is paramount, but knowing where your rangefinder is “sighted in” is critical for precise measurements. The following three variables dictate the accuracy and precision of your rangefinder:
Crosshair Alignment: To check this, I take a square piece of cardboard (about 3’x3’) and staple it to the cut end of a 2×4, then nail the 2×4 to the top of a fence post or something of similar height. Then I step back to a typical shot distance of 40 yards and face the cardboard.
At this point, you should be able to see the cardboard, but not the 2×4. To test the laser/crosshair alignment, I first range the center of the square, so I know the distance, and then move the crosshairs to one side and see where the laser starts reading what’s beyond the square.
Next, do this top to bottom, as well. If you have to move the crosshairs several inches above the square before it reads beyond it, then you know your laser is actually reading several inches below your crosshairs at that range. Some rangefinders seem to be perfectly aligned, but the majority I tested were slightly off. This didn’t mean they were inaccurate; you just need to know where to aim if you don’t have a large target.
Beam Precision: After figuring out the alignment of each model in this review, I performed another test where I cut a 4” hole in a piece of cardboard and then figured out how far away I could get with each rangefinder and still get a consistent reading through the hole. This helps me determine what models would give me the best chance of getting an accurate reading off a small target like the head of a deer or through a narrow lane of brush.
Fine Accuracy Over Distance: I also did a test that included tape measuring distances of 50, 51, and 52 yards from the side of a building at a right angle, and taking measurements with the rangefinders. From here I checked a couple things:
- I took multiple measurements with each rangefinder from the same point to make sure I was getting consistency in each measurement.
- I took a measurement at all three distances one after another to see if they recorded the one-yard differences.
This may seem like overkill, but last summer I purchased new archery software called Archers Advantage Online and noticed a section that allowed me to enter in my exact bow and arrow specs and print out my ballistics.
What I found was that my arrow is dropping nearly 3” per yard at 60 yards. Everyone knows their arrows drop more and more the farther they shoot, but considering I shoot a fairly average hunting setup in terms of speed and trajectory (my setup is shooting at 278 fps), what I printed out really made me think. A mature mule deer buck has an average kill zone of roughly 10” vertically, so if I’m aiming for the center of the kill zone at 60 yards, my margin for error on shot distance is +/- 1.7 yards! That’s why I like rangefinders that give accurate measurement readouts down to 1/10 of a yard.
Speed of Reading/Readout
This is an important variable to me and isn’t something I’ll compromise on. I won’t hunt with a rangefinder that isn’t blazing fast with the initial readout and also time between measurements, as well as when scanning.
Very rarely do I range an animal only once and then shoot. Normally, I use the scanning feature to assure I’m getting an accurate reading on my target. Scanning isn’t a mode you have to enter into through the menu; you simply hold down the measure button and it gives you continuous measurements of different objects as you scan over them. This is great for hunting – you can scan back and forth/up and down over the animal and it gives you a much better chance of getting an accurate reading. Having a rangefinder that will quickly and continuously display one reading after another is important when you’re within bow range of a mature wild animal.
Some rangefinders give a quick line-of-sight reading, but have a delay in showing the angle-compensated horizontal distance, which is all that matters on angled shots. Make sure you factor in the time it takes you to get the number you need, and not just how long it takes to get the first measurement.
Modes & Settings
Bush Mode/Target priority: There are some invaluable modes available in many rangefinders today, such as “last target priority” mode, sometimes called “brush mode” and “first target priority” mode. After missing a nice Idaho bull because of some blades of grass between the bull and me that gave an inaccurate reading, causing me to miss low, I’ve started using rangefinders that offer these modes a lot more depending on terrain and conditions. Being able to quickly toggle through these modes and be confident in knowing what mode you’re in is critical. Some models are quick and easy; others take too much time.
Brightness Settings: Another variable to consider is the red LED or OLED displays and how quickly you can toggle through brightness levels (not all models have different brightness settings). This adjustment is important to be able to see your display depending on the lighting conditions (sun vs. dark timber).
Versatility
While I use my rangefinder to tell me the distance to an animal, I also want it to be able to help me plan out a successful stalk by ranging distant landmarks. I don’t know how many times I’ve hiked and crawled to what appeared to be a location that would put me well within shooting range, only to find out I was still too far away. Having the ability to range from afar and tell if certain landmarks will get me within shooting range is a big deal to me. Basically, the farther my rangefinder will give me readings, the better.
Another bonus of having more ranging power is for hunters that hunt with both bow and rifle. Having one rangefinder that can do both jobs well is practical and smart.
Another aspect of positive versatility is having a display that works equally well in bright light and low light. For the most part, black LCD displays work best in bright conditions and red LED or OLED displays work best in low light. It would be great to have a rangefinder that could automatically or manually switch from black to red depending on conditions. The Nikon in this review has this feature, but in my opinion, it has other issues that need to be worked out.
Premise
To reiterate, this review is geared specifically toward spot-and-stalk bowhunting, factoring in attributes that are important to me as a bowhunter. Some of the attributes I want for spot-and-stalk bowhunting aren’t as important for bowhunting from tree stands or most rifle hunting situations. This became obvious to me with a couple models in this review that are proven and dependable rangefinders for rifle hunters which I felt were subpar for spot-and-stalk bowhunting. Now on to the review!
Bushnell G-Force DX
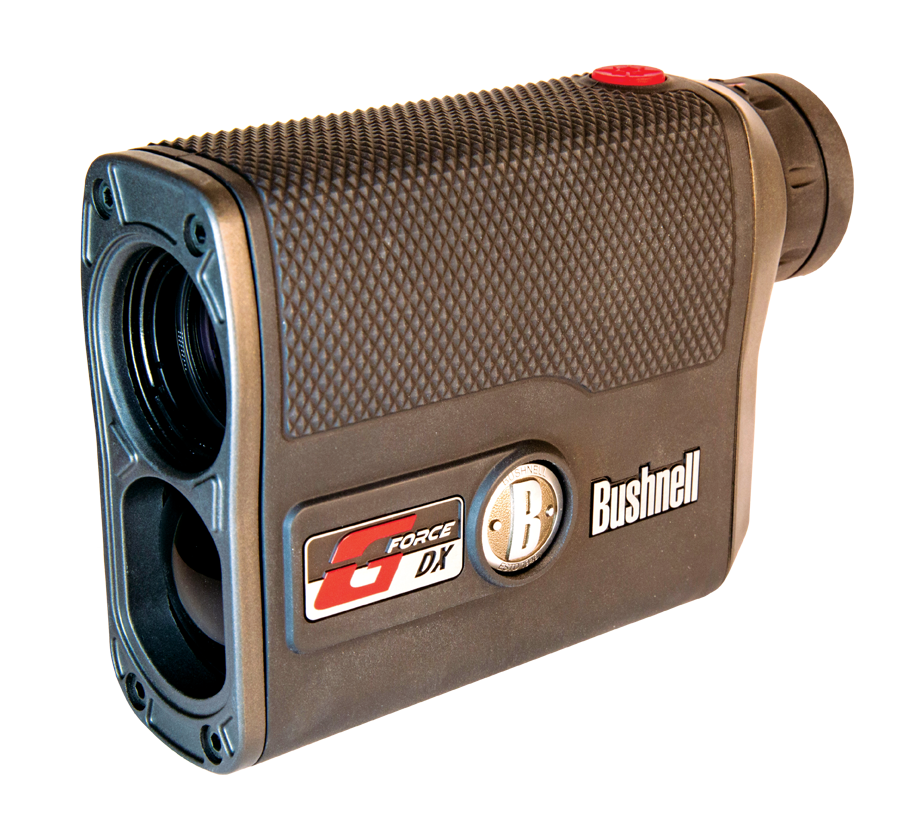
The G-Force DX is a well-rounded rangefinder and the price isn’t bad either. One of the first things I noticed was that it delivers blazing fast readings even when scanning.
Another great feature this model has over many others is that it gives you the true line-of-sight distance, shot angle, and the angle-compensated horizontal distance all in one reading. The problem I have is the way it is set up in the display. The prominent number displayed is the line-of-sight with the angle and horizontal displayed below and with smaller font size. All the numbers are easy to read, but what I fear will happen is that in crunch time, I’ll read the biggest number (line of sight) instead of horizontal distance. If these two numbers could be swapped in the menu, I’d be in love with this model.
Target priority modes are available, and toggling between different modes and display brightness settings are quick and easy. However, the target priority modes didn’t seem to work as well as others when it came to filtering out brush between the intended target and the rangefinder. Another thing to note was that the scanning feature wouldn’t work while a target priority mode was enabled.
While I felt that the optical quality of the glass was great, I found that once the laser is activated, a red tinted light bleeds out from the display’s readout and inhibits about 35% of the view. It’s more noticeable with the brighter display settings enabled. It’s not hard to see through this portion of the view, but it’s not as clean looking as some other models.
This rangefinder’s red display was not as easy to read in bright conditions, even on the brightest setting. This is something to consider if you hunt primarily in sun-scorched open country. That said, this model is one of the best choices for getting very precise measurements that measure to 1/10 of a yard, which as discussed earlier can be a factor on longer shots.
Best qualities: Blazing fast readings even when scanning; all readings in one view; good glass; great accuracy on longer readings.
Could be better: Needs to have true horizontal distance as primary display; target priority mode could function better; some tinted distortion when laser is activated.
Cost: $399
Contact: www.bushnell.com
Bushnell The Truth with Clearshot
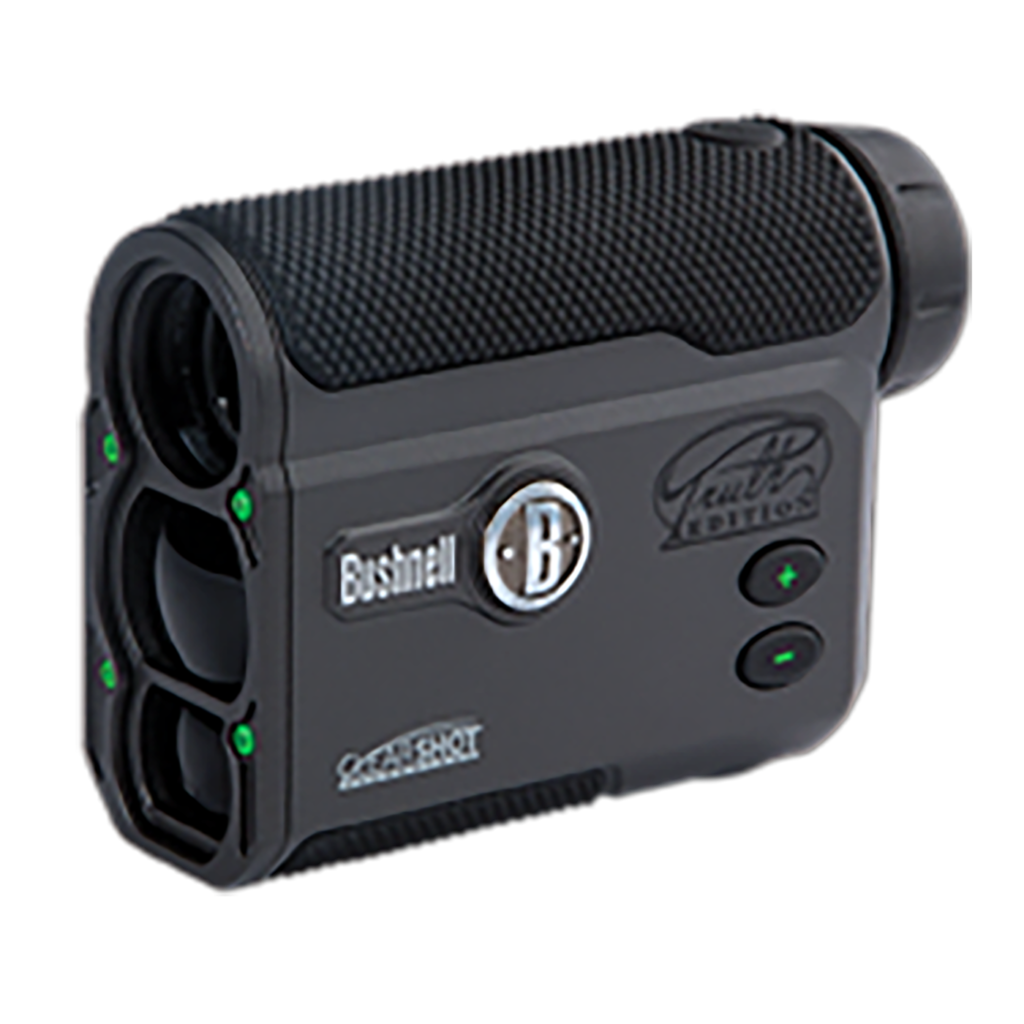
This rangefinder is extremely lightweight and has a wide field of view, making it very easy to locate your target through the monocular. It also has less magnification than most rangefinders at 4x, so if you are someone who has trouble locating targets through your rangefinder, this would make your life easier.
This model has a cool and unique feature called Clearshot, which, upon ranging a target, will tell you the max height of your arrow’s trajectory at that particular shot distance. This is great for knowing if your arrow is going to hit any branches on its flight path. This feature is easy to calibrate to your bow and arrow setup and is a feature I’d love to see on more rangefinders.
There is no focus adjustment, which I found unusual. Still, I never had any issue focusing on targets with the autofocusing monocular. There are two features missing that I’d have liked to see: 1) a last-target priority or first-target priority modes, and 2) a scanning feature. And while the initial range speed is good overall, when factoring in that you have to press the button every time you want to range a new target, it’s slower than models like the G-Force DX that have a scanning feature.
I do like the info that this model gives you — line of sight and horizontal distances and shot angle. However, as with the G-Force DX, I don’t like the way it’s arranged in the display, with the line-of-sight distance being the most prominent.
Best qualities: Clearshot technology; wide field of view; initial range speed is good; good info display
Could be better: No focus adjustment; no first/last target priority; no scanning feature; line-of-sight distance is primary display.
Cost: $379
Contact: www.bushnell.com
Leica Rangemaster 1000-R
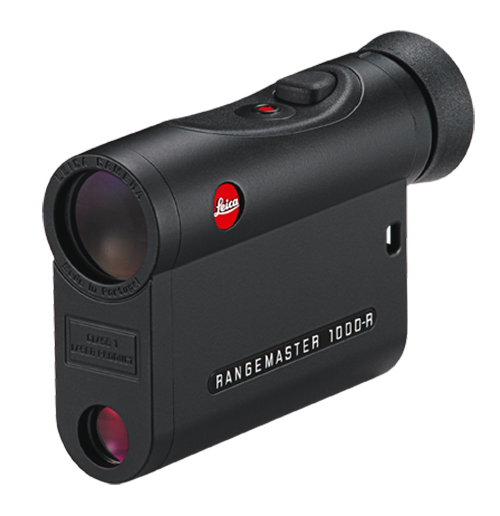
I was excited to get my hands on this model, since I know some rifle hunting buddies who have great success with theirs. I can easily see why they loved this unit — it’s relatively lightweight for what it can do and has great optical quality. However, this model helped to pinpoint differences in what rifle hunters may need and what spot-and-stalk bowhunters might prefer.
Easily my biggest disappointment was with the Leica’s speed. Its initial range time is just average, and follow-up readings take too much time for my liking. Scanning is also slow. This model gives line-of-sight and true horizontal distance displays, but I’m not a huge fan of how it’s displayed. After pressing the button to get a range, the first number to display is the line-of-sight, followed two or three seconds later by the critical horizontal distance.
I like to use some of the modes such as “brush mode” that gives you the range of the farthest object in the lasers path preventing the user from getting a false reading on a blade of grass in front of the animal, but this model doesn’t have any such modes.
The display is clean but void of a battery level indicator. It does notify you by blinking the LED display when it’s low, but until that happens you don’t know if you are at 90% or 20% battery life.
As expected with the red LED display, it was easy to read in low-light conditions, and even in bright, sunny conditions with dry vegetation. Out of all the red LED-type displays in this review, this was the easiest to read in bright conditions.
This model performed very well in both accuracy tests I did; second-best in the cardboard walk-back test and perfect in the tape measure test. The crosshair/laser alignment was like many in the review – slightly off, with the laser reading below the crosshairs.
Best qualities: Optical quality; very accurate; easy-to-read display in low-light and sunny conditions.
Could be better: Slow readings; no brush mode; no battery level display; most expensive in review.
Cost: $599
Contact: us.leica-camera.com
Vortex Ranger 1000
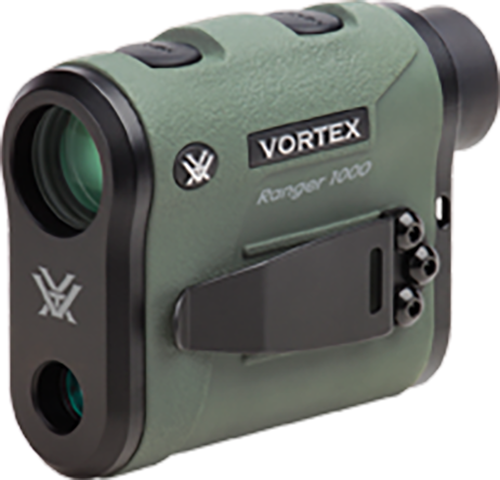
This is a safe all-around option without any glaring issues. The construction is solid and built for the beating that’s bound to be dished out on spot-and-stalk hunts out west. The Ranger also features a clip that can be attached to either side. It’s not something I used all the time, but it’s handy.
The optical quality is solid and the display is very functional. It displays the horizontal distance only when it’s in angle compensation mode. While I’d like to see a small secondary reading that also shows true line-of sight, at least this model is giving me what’s most important and eliminates the possibility of shooting the wrong distance. There aren’t any target priority modes or “brush modes” available in the menu, but you can adjust the display brightness, which is important for sunny conditions.
The Ranger 1000 performed well in the cardboard walk-back test, tying for the third-most accurate in that test. There was a one-yard discrepancy for one reading on the tape measure test, while the other two measurements were perfect.
This rangefinder requires you to push the measure button three times to get a reading, while most rangefinders only require twice. The laser seemed to be reading slightly lower than the center of the crosshairs, but after learning this I was able to get very good accuracy in my cardboard walk-back test. The scanning feature works well but is a little slower than I prefer.
Best qualities: Built tough; accurate; good optical quality; displays true horizontal distance as primary in angle compensation mode; brightness display adjustment;
Could be better: No brush mode; scanning is a bit slow.
Cost: $379
Contact: www.vortexoptics.com
Leupold RX-Full Draw
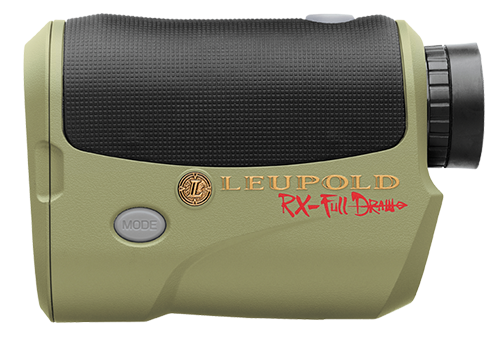
There aren’t any rangefinders that I can’t find something to complain about, and while this one isn’t perfect, it’s one of my favorites. This model rates very well in many of the categories that are important to me. It displays the angle-compensated horizontal distance and shot angle, a huge plus. This unit is also lightweight and fast with initial reading and while scanning.
Another great feature is that it gives very precise measurements; to 1/10 yard. The crosshair/laser alignment was perfectly centered and it has finer crosshairs than most models for more confidence in ranging tight spots. This rangefinder was also the most accurate on the cardboard walk-back test – I was able to effectively range through a 4” diameter circle cutout at a distance of 35 yards. Target priority modes are also nice features with this model and work well.
The optical quality isn’t as good as some models, but it gathers light well due to the generous exit pupil. The optical quality isn’t bad in the center but distorts on the sides (of marginal importance on a rangefinder).
Unlike most of the models in the review which use a red LED or OLED, this one’s display is an LCD, which is black. The red LED is often better in low light, but I actually prefer the black. I find that I get more shot opportunities in bright conditions than I do in low light, and sometimes it’s hard to see red displays in bright conditions.
Keep in mind that I live in Wyoming and mostly hunt the Rockies. However, if I lived and hunted in the rainforests of the Pacific Northwest or Alaska where there are often darker conditions, I’d rather have the red LED display. This unit makes a slight clicking noise when pressing the measure button. It’s not loud enough to be an issue, but it would be better silent.
Best qualities: Focused laser; very accurate; displays true horizontal distance; fast measurements and scanning; lightweight.
Could be better: Optical quality could be better; slight clicking noise when depressing button.
Cost: $399
Contact: www.leupold.com
Leupold RX-1200i TBR
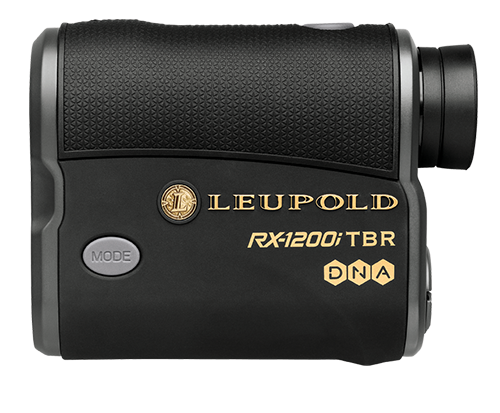
This unit has all the features of the Full Draw model as well as additional features geared in large part toward rifle hunters (making this a good choice for hunters wanting one unit that can do both). The main differences as far as a bowhunter is concerned is that this one can range a lot farther, making it nicer for planning stalks, and it has a red OLED display for those who prefer it over a black LCD.
The speed while scanning isn’t as fast as the Full Draw, but it’s adequate. This model’s last-target priority mode seemed to work the best of any in this review, effectively and consistently filtering out brush in front of the intended target.
In the cardboard walk-back test, this unit did well, tying for the third most accurate. The crosshair/laser alignment was like many in the review — slightly off, with the laser reading slightly below the crosshairs. I did get one reading on the tape measure test that was one yard off, while the other two readings were good. This is the most compact rangefinder in the review.
Best qualities: Last-target priority mode works extremely well; good range; focused and accurate laser; compact.
Could be better: Optical quality could be better; second most expensive in review.
Cost: $499
Contact: www.leupold.com
Halo Xtanium 1000
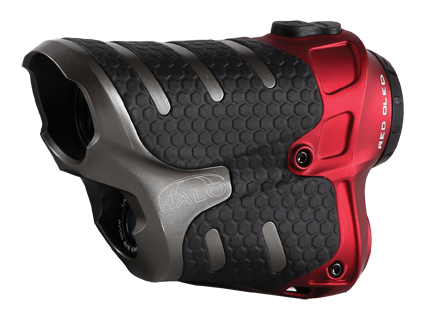
This is the only rangefinder in this review that has a fully encased metal housing, which is why it’s also the heaviest. Weight isn’t a factor I’m overly concerned with compared to a lot of other attributes, but this model is over double the weight of some in this review; a little too heavy for my liking. It has the highest magnification in the review at 8x but also has the narrowest field of view, making it tougher to quickly acquire targets. The higher magnification also results in a less than ideal exit pupil size of 2.7mm, making it the poorest performer in low light.
There are no target priority modes but there is a scanning feature. The scanning feature takes longer to activate than other rangefinders, and the time between each measurement is slower than most also.
The red OLED display was the hardest to read in bright sunny conditions but it was great in low light. The rangefinder does give you the “shoot for” horizontal distance as well as shot angle readout, which is nice.
Best qualities: Least expensive; highest magnification; true horizontal distance display.
Could be better: Heavy; struggles in low light; no target priority modes.
Cost: $299
Contact: www.halooptics.com
Nikon Archers Choice Max
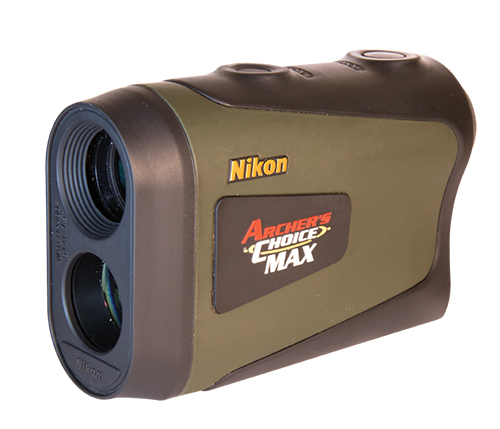
This rangefinder isn’t brand new; however, their new models have not yet been released. The unit is the largest in the review but also one of the lightest.
This model has a neat feature that I’d love to see in more rangefinders — it automatically switches from a black display in bright conditions to a lit red display in low light. The concept is great, but when the red low-light screen kicks on, it emits a red haze that lightly obscures the target, and the low-light performance is less than ideal to begin with.
The display is very simple. When you’re in angle-compensation mode, the readout gives only the true horizontal distance, which is all that matters, but there is no angle or true line-of-sight info without changing modes.
A couple things I noticed were that the mode button is easy to accidently hit and toggle the angle compensation mode on and off. Most mode buttons need to be held down for a few seconds to get into the menu, but with this model it changes angle compensation with one quick touch, and I was often finding my settings had accidently changed.
Target priority modes are available with this model. However, they didn’t filter out brush as effectively as other models. I didn’t like how easily the battery door opened and I was afraid of the battery accidently falling out (which didn’t happen), so I put tape over the door for insurance. Still, there are some features that make the Nikon worth a closer look. One is that it’s less expensive than most. Second is it’s very fast, even when scanning. Personally, I’d rather use a fast rangefinder that’s poor in low light than a slow rangefinder that’s great in low light. It also gives measurements to 1/10 of a yard.
As the name implies, this device is built specifically for bowhunting and consequently doesn’t range very far, making it rather useless in planning stalks. On the bright side, it still does great for the price.
Best qualities: Display switches automatically for light conditions; lightweight; shows true horizontal distance; fast readout.
Could be better: Low light performance is subpar; red display creates haze; easy to accidentally change settings; brush setting could be better.
Cost: $349
Contact: www.nikon.net
Conclusion
The way a rangefinder processes info and calculates measurement isn’t foolproof; it can fail due to electronics, battery, and very often in rain, snow, and fog. If you have no idea how to judge yardage yourself, you’ll have no way of knowing if something looks “off”. Practice to become an expert in times of emergency. There have been plenty of times when I couldn’t get a consistent reading for one reason or another and had to use my own judgment on what distance was actually the correct one. As with anything, the more you practice, the better you will become, and you’ll further increase your chances of preventing a disaster.
About the Author:
Nate Simmons is the Backcountry and Gear Editor at Western Hunter and Elk Hunter Magazines and the Producer and Co-Host of The Western Hunter TV show, as well as past Co-Producer of Eastmans’ Hunting TV. He has written dozens of hunting articles. Nate is one of the most extreme backcountry bowhunters on the planet and prides himself on being a self-sufficient DIY hunter.