
One of the most overlooked aspects of the physical preparation that goes into mountain hunting is the hunter’s movement quality, both in terms of how they train — a topic we’ve written about extensively in our Mountain Fitness column — and how they move on a basic day-to-day basis. This movement quality starts with what the physical therapy and orthopaedic field has come to call mobility. Mobility in its simplest sense is the ability to produce a desired movement, ideally with the requisite stability to support and stabilize that movement. This is an important qualification as many people mistakenly think that flexibility is the same as mobility and this could not be further from the truth. Clinically, I’ve seen a LOT of people with tons of flexibility but little to no ability to stabilize in these extreme positions. Throwing down fancy yoga moves may look cool but if you can’t add a pack or some weight to the mix what good is that flexibility? Remember, we’re all about real world aptitude here folks. Ying and yang, mobility PLUS stability.
Regardless of where you are in your training program, the movements below can and should be incorporated on a regular basis and can even be done in the field when you’re multiple days into a hard ass hunt.
T-Spine Rotation (With Reach):
The thoracic spine (T-spine for short) makes up the majority of your back. It encompasses 12 vertebrae, which all of your ribs attach to. When it comes to trunk rotation or twisting, the T-spine is where this is meant to happen. Unfortunately for most people, this is not the case, due in large part to our sedentary lifestyles and the fact that the majority of our day-to-day lives consist of using our arms out in front of us.
Prolonged daily sitting leads to the T-spine, and its supporting musculature, being “trained” into flexion (aka bent forward) and typically presents as a slight hunch-backed appearance in many adults. This is horrible for the backcountry enthusiast as the vertebrae become essentially fixed in this position through soft-tissue and neural adaptations. All ranges of motion are compromised, but it is the rotation that is the crux, leading to a multitude of back issues if not resolved. When the T-spine loses range-of-motion (ROM) the forces that usually are managed by a healthy, mobile T-spine are transferred to the lumbar spine (lower back).
The lumbar spine is not meant to rotate — there are 5 lumbar vertebrae and they only have 1 degree of rotation per segment; that’s only five degrees total! When the lumbar spine has too much rotational force put on it, you can put yourself in serious trouble. There exists the potential to sprain spinal ligaments or even herniate a disc in a worst-case scenario. I can promise you, if you’re in the backcountry and you truly herniate a disc in your lumbar spine, you will sure-as-shit hope you have a sat phone with you!
For the mountain hunter who is running a 40 lb – 100+ lb pack, the T-spine absolutely needs to be mobile. The added weight from your pack and meat/cape (hopefully), coupled with the shearing forces from the forward lean you’ll see on most backpack hunters carrying serious weight can transfer serious stress to the lumbar spine if the T-spine is not as supple and mobile as possible.
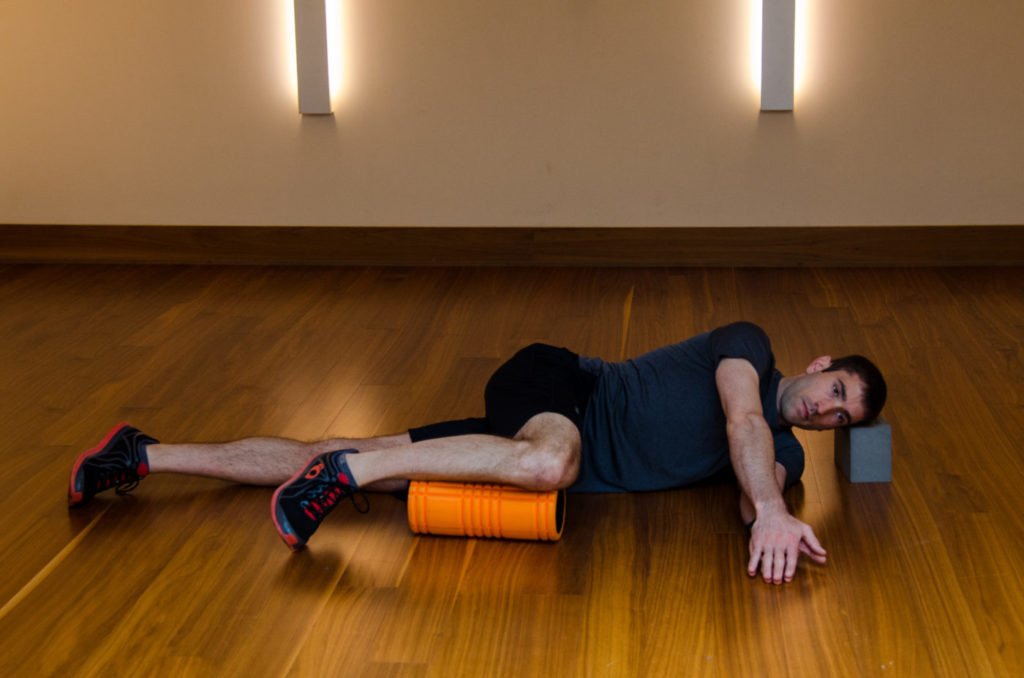
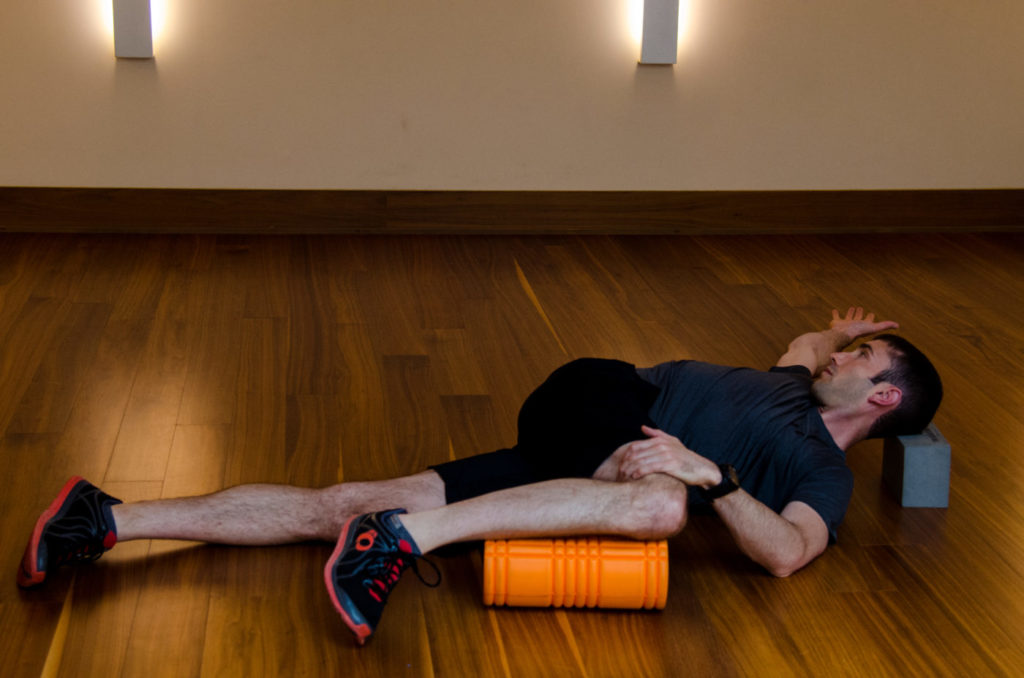
Enter the T-spine rotation with reach. This is an excellent, safe, and field-applicable way to keep your thoracic spine mobile. It is a staple with the FMS crew and is used by thousands of therapists worldwide. Here is a link for an instructional video from the Functional Movement Systems team.
https://www.functionalmovement.com/exercises/12/t-spine_rotation_with_reach
Key points to keep this mobility exercise safe are to be sure the top leg is flexed to 90 degrees and to focus on proper breathing. Having the top leg at 90 degrees locks in the lumbar spine and keeps it from over-rotating; ensuring all the rotational force you are applying is transferred through the thoracic spine and associated structures. Also be sure to take a full breath in before you initiate the movement and slowly and completely exhale though the movement. As you progress to the end ranges of what your T-spine can do, you will feel it tighten up and instinct will be to hold your breath. DON’T. If you hold your breath, you will increase the pressure inside your chest. This will only decrease your range of motion.

Kneeling Hip Flexor Stretch:
Hip flexion is an integral part of walking, running, hiking, and more-or-less any type of ambulatory movement. The primary hip flexors are made up of three different muscles: the rectus femoris (the most superficial of the four quadriceps muscles), the psoas major (what hunters know as the tenderloins), and the iliacus (sits along the inside of your pelvis). Psoas and iliacus are commonly associated together as “iliopsoas” as the two muscles join together and attach in the same spot on the femur (thigh bone).
The issue with hip flexion is that, once again, the bulk of the population is subjected to sitting for most of the day with their hips flexed at 90 degrees. This again “trains” the hip flexor muscles into a shortened position/state. Many hunters then compound this problem by focusing too heavily on hiking uphill (one of the reasons we are SO against stair-climbers and step-mills), as these three muscles are crucial during ascents.
Those are the two obvious factors that contribute to the formation of short/tight, dysfunctional hip flexors. Another concern is that once you start ascending steeper terrain, your hips’ entire range of motion is reduced. Think about it — you rarely stand and go into full hip extension while in steeper terrain. With long sustained climbs day in and day out, this repetitive, shortened functional range compounds and adds to the already reduced range of motion.
Now that you have these three issues conspiring against you, the deal-breaker comes from an anatomical standpoint: the psoas major originates on the sides of your lumbar vertebrae and discs. As a result, once the psoas is short and tight from the above circumstances, and the hip is then put into full extension (simply standing up straight), the psoas will PULL on the lumbar spine and discs. This causes the lumbar spine to go into excessive extension (lordosis – think a drawn bow). Because the lumbar region is the load-bearing portion of the spine, it is now in a compromised position. Add a load from your pack and there you have it, the serious potential for spinal injury!
One of if not the best preventions for such a compounding problem and potential spinal injury is to combat tight hips with the kneeling hip flexor stretch. This is an excellent way to mobilize the hip flexors and open up the majority of your anterior chain (the front side of your body’s musculoskeletal structures).
Start in a single-leg kneeling position with the kneeling leg in line with your torso and shoulder. Be sure to have your spine in a tall neutral position. Your other leg goes in front of your body with the knee and hip aligned, both flexed at 90 degrees. Take both arms and place them one on top of each other on your hiking pole.
To initiate the movement, take a deep breath in. As you slowly exhale, shift your entire body, in unison, forward ever so slightly, while keeping your knee and foot fixed on the ground, with the foot relaxed. The key is to press down with both hands to engage the anterior chain while maintaining the same hip and spine alignment so the stretch is focused on the hip flexors and not the abs. You should feel a deep stretch along the front side of your leg and even deeper into your lower torso. Do not extend at the low back (see photo example below of the WRONG position)!
This is a common mistake and will naturally occur if you have excessively tight hip flexors so pay attention to your form and ideally do this in front of a mirror at the gym or at home before attempting in the field.
STARTING POSITION
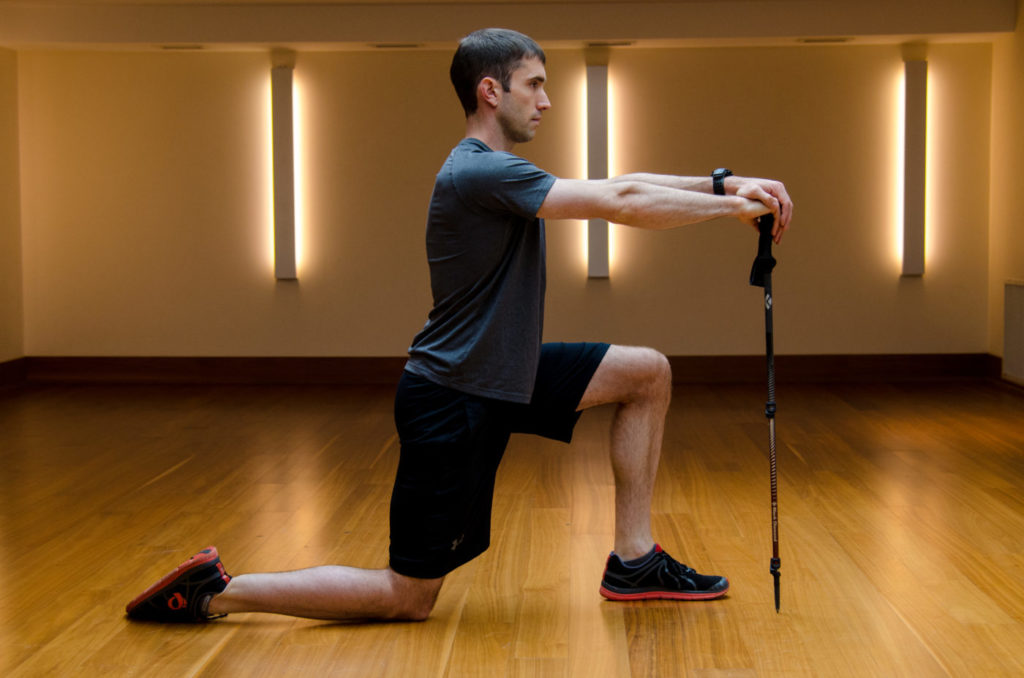
FINISH POSITION
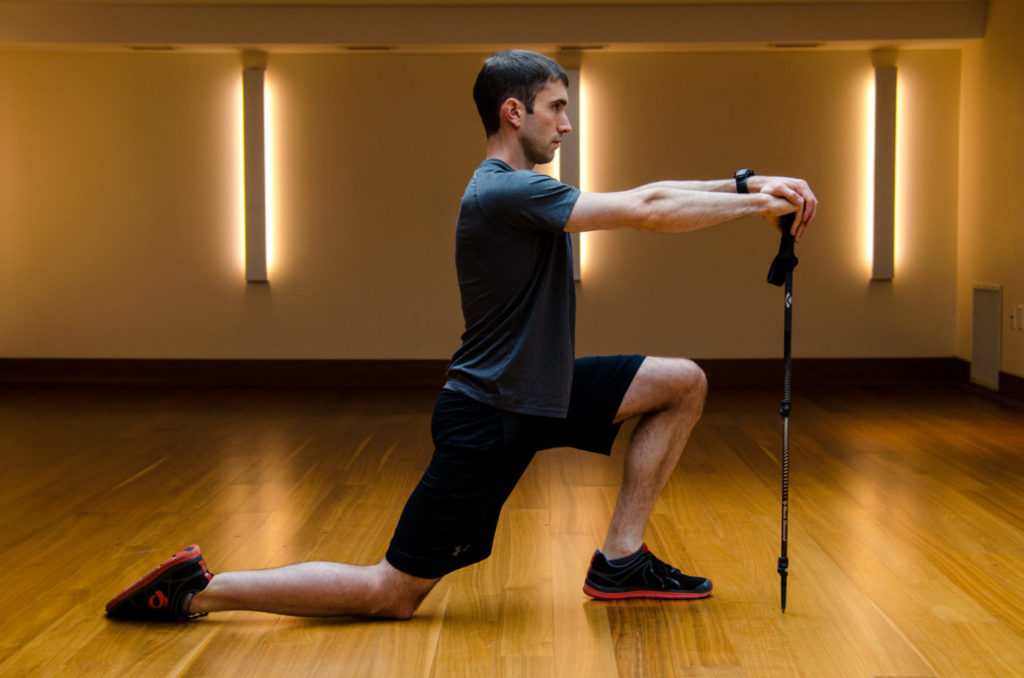
INCORRECT FORM! 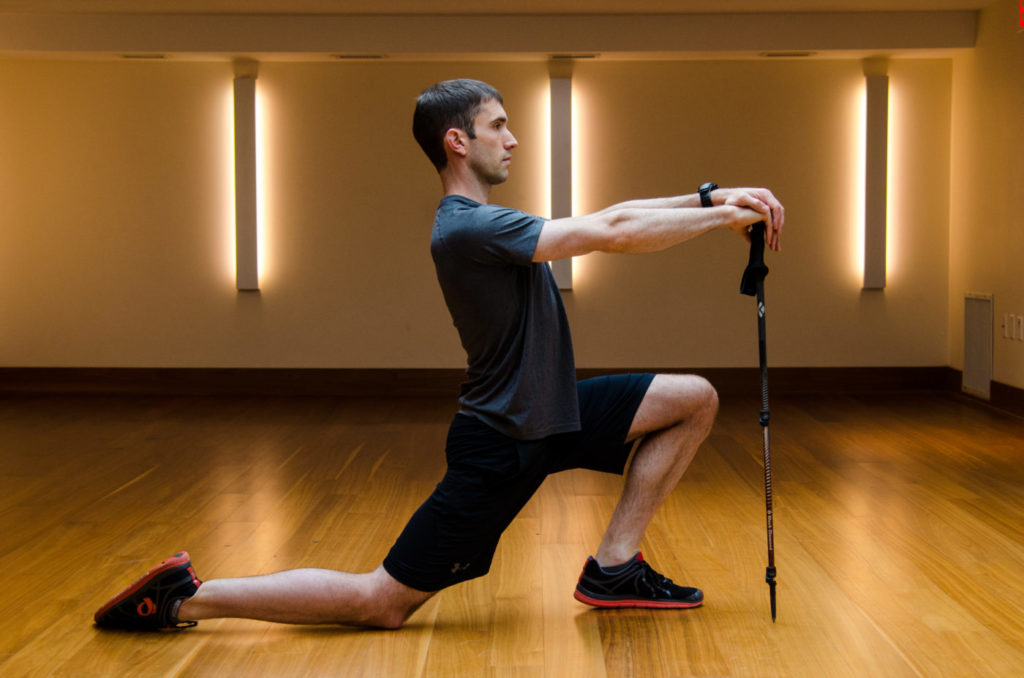
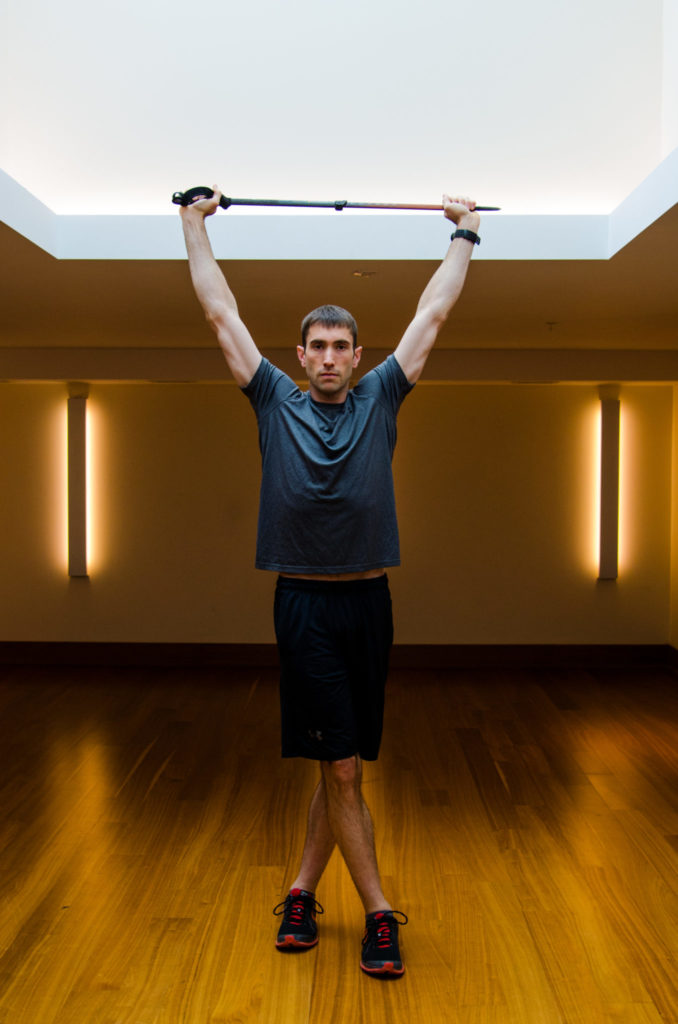
QL Stretch:
The quadratus lumborum — most often referred to as the QL — can without question be one the most debilitating muscles when in an acute state of stress. The QL is usually the culprit when you hear someone say, “I threw out my back” (when there is no injury to a disc). Similar to the psoas, QL’s importance and significance when injured is due to its anatomical attachments. QL is the deepest muscle in your back (your kidneys sit in front of it on either side of your spine). It attaches on the bottom part of your 12th rib and the outside of the lumbar vertebrae and runs vertically down, attaching to the top of your pelvis toward the midline of your body.
Put simply, the QL connects the upper part of your body to the lower. This is an integral muscle for just about any upper body movement but there’s a dark side to it, when QL is in an acute spasm, any movement of the torso will cause pain. The attachment on the 12th rib and lumbar vertebra means that coughing, sneezing, laughing, twisting, bending, leaning to one side, and even taking a deep breath could all be excruciating. Along with the lower attachment on the pelvis, any hip range of motion will cause the pelvis to move; therefore, any ambulatory movement is very limited, and sitting to standing can be almost impossible. In very acute cases where the QL has been flared up, the only way to move is by crawling! QL spasms can quite often happen very suddenly, described as a “quick twinge” in the lower back followed by a progressive tightening in the same region, resulting in a fast stabbing pain with any type of the aforementioned movements.
Applying this to mountain travel under load, the QL works overtime by helping stabilize the lower back and pelvis. This is necessary due to your pack’s inertia — as you walk, the pack moves side to side. When it moves to the right, the left QL has to contract to help keep your torso straight. Pack design has come a long way to mitigate this with pivoting harness systems, but regardless of the advancements in pack engineering, this problem still occurs. With the increased stress on the QL from a long day hiking under load, it is already overworked and fatigued; this is frequently followed by a much-needed rest or glassing session where you sit on the ground in an awkward position, possibly hunched over or leaning to one side, resulting in the QL being either lengthened or shortened. Like any other muscle, it will start to tighten up. Now you have a fatigued, tight QL that is a ticking time bomb. When the full-curl cranker you have been waiting for shows up in the next drainage and you quickly get up to start the pursuit and put on your pack, bending and twisting under load, your QL says, “Not a chance!” And there you have it, an acute QL spasm. Best of luck with the rest of your hunt! Fortunately, this is easy to prevent and avoid.
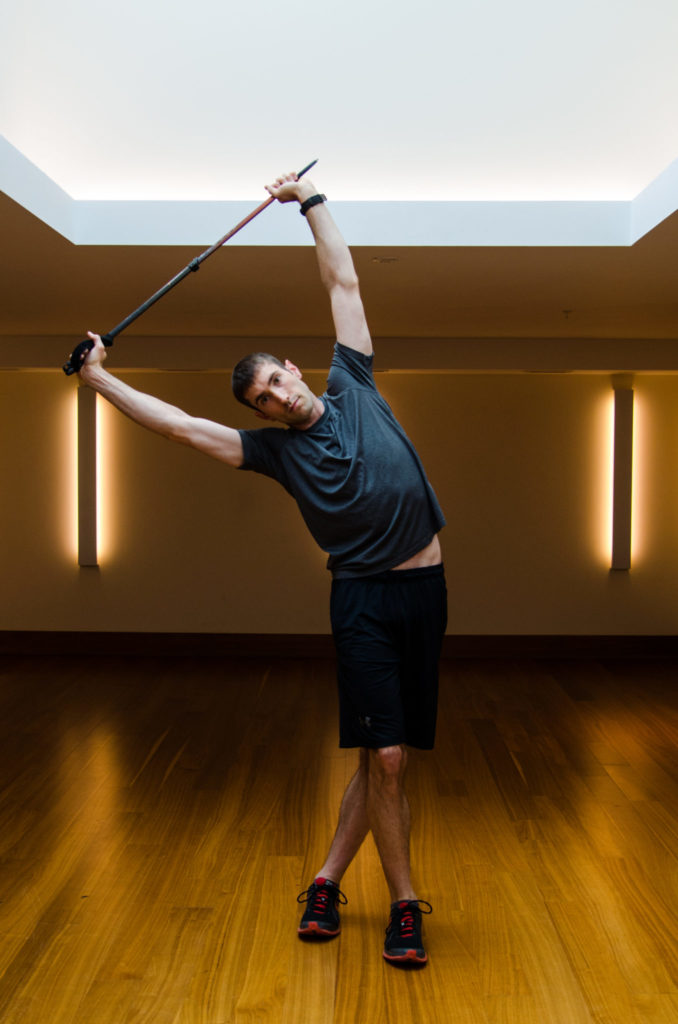
The QL stretch is very easy to do and incredibly effective at mobilizing the entire lateral chain of the body (the outside of your body’s musculoskeletal structures). Start in a standing position with your feet slightly staggered; cross one leg behind the other so there is a gap of about a foot between your front and back foot. Now grab your hiking pole with both hands slightly wider than shoulder-width and raise it above your head with your arms fully extended. Initiate the movement by standing as tall as possible, taking a deep breath in and as you exhale, slowly bend sideways towards your back foot. If your QL is really tight, you might not get very far. Do not hold your breath — be sure to dump all the air out of your lungs as you side bend. Once you have fully exhaled, slowly return to the starting position and switch legs and do the same to the other side. The key is to make sure your torso stays in line with your legs, and to bend sideways, not forward.
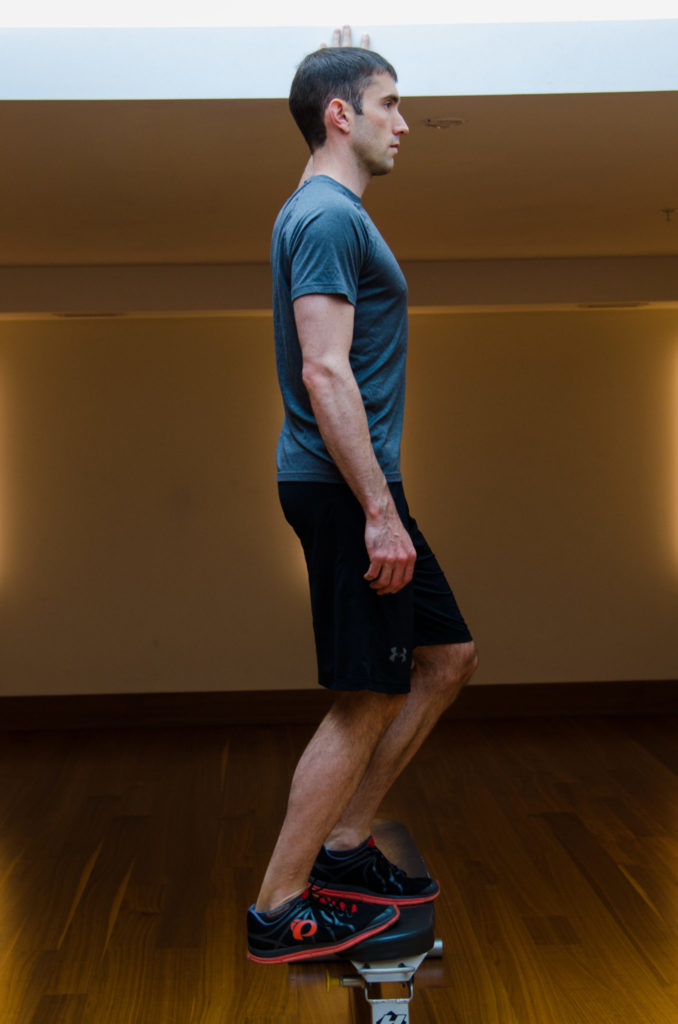
Lower Leg Mobilization:
The gastrocnemius (gastroc) and soleus are the two muscles that make up the incredibly strong, primary muscles on the backside of your lower leg. These two muscles are compartmentalized together in a fascial sheath (like a sausage casing) attaching just above (gastroc) and below (soleus) the knee and traveling down the leg, where they come together to form the Achilles tendon, before attaching to the back of your heel bone (calcaneus). This forms what is collectively know as the posterior compartment of the leg. The posterior compartment is the prime mover of the ankle joint complex with respect to plantar flexion (pointing your foot down aka pushing UP a slope). They are extremely strong muscles and also take a tremendous amount of load when in the backcountry. This can be a tricky spot to deal with when it comes to stretching in the field, simply because sometimes it is the last thing you want to do.
With long ascents and increased load from a pack, the posterior compartment is put under a lot of tension. When you plant your forefoot on the ground and load your weight on it, the foot goes into dorsiflexion (pointing your foot up). This happens every time you walk, but an incline rather than a flat surface increases the amount of dorsiflexion. The result is the gastroc and soleus are in a more stretched-out position, decreasing their ability to form a forceful contraction, creating the potential for a strain (muscle tear) or spasm.
Additionally, if the ankle joint has poor mobility and range of motion, this will add an even further load/stress to the posterior compartment. Its simple physics: if you have a joint that is intended to transfer load and that joint is not articulating properly, the forces don’t disappear — they simply transfer elsewhere and in this case it’s to the posterior compartment. This can lead to a flared up Achilles tendon or even a full rupture, and once again, you’d better hope you have a sat phone!
So how can you lessen the chances of such an injury? Because you have essentially been doing a dynamic posterior compartment stretch the entire time you have been ascending, there is not an immediate need to go ahead and put the tissue under load and stretch it again. We all know muscle tissue needs time to recover when put under load (you don’t go to the gym and train the same muscle groups every day); the same goes for stretching.
Stretching the posterior compartment is best done before you are going to load it on a big ascent or the next morning after a big day, with the down time at camp and helping the tissues recover. That being said, don’t load into a deep stretch the second you get up. Move around, go for a light walk, and get a bit of blood flowing — even some light self-massage is ideal. If you are dealing with other issues like plantar fasciitis, these stretches can flare things up, but by the same token there is a good chance the plantar fasciitis is caused by having a tight posterior compartment and/or poor ankle mobility. If this is the case, you definitely need to go and get some manual, hands-on therapy.
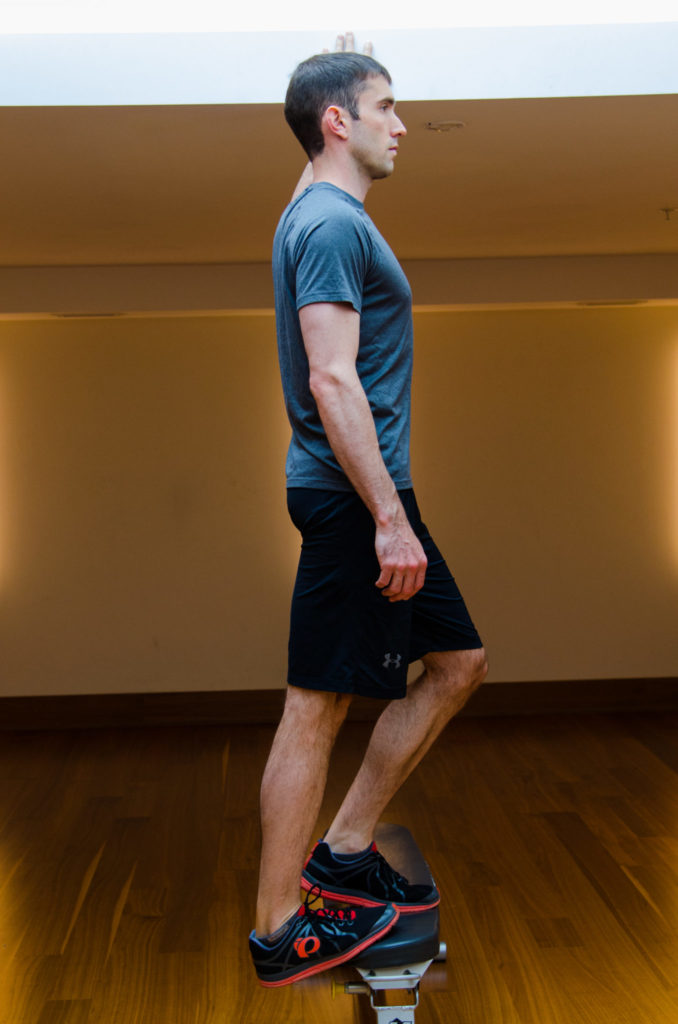
The posterior compartment stretch is one of the most basic stretches out there; however, there are a few subtleties that can make it very effective and reduce the potential to cause problems. Start by placing your foot on the edge of a rock or anything that is firm and elevated enough so your heel can drop down and not touch the ground. The key is the foot placement. You want your foot far enough off the edge to allow the heel to drop but not so far that you’re mostly stretching the foot itself. If your foot is too far off you will be putting too much load on the toe joints, especially the big toe. This will also cause the deep, intrinsic muscles of the foot and leg to engage, increasing tension in the very areas you are trying to stretch. If the foot is too far forward, you won’t be able to drop your heel down far enough to feel a stretch in the gastroc and soleus.
Now with your foot in the right position simply drop all your weight down while keeping your knee straight and fully extended. After that, simply bend your knee slightly; this action will slacken off the gastroc since it crosses the knee joint, thus loading into and stretching the soleus, which does not cross the knee joint.
General Stretching Tips:
When it comes to the frequency, intensity, and duration of stretching, the jury seems to be out and much of the literature is contradictory. Most people don’t stretch at all and those that do quite often do it wrong. As far as frequency is concerned, it is safe to stretch every day; however, the second two variables must be applied properly if doing so.
Intensity is how “deep” or how much you “feel” the stretch. There should never be any true pain involved with stretching. Pain is very subjective and varies drastically from person to person. I prefer the word discomfort, as it is usually the precursor to pain but this is a very subjective term as well. Slight discomfort when stretching is relatively normal as your body has a very good protective mechanism that prevents you from stretching too deeply. At times when going deeper into a stretch, the body segment you are stretching will start to shake. This is your body telling you to back off. The tiny receptors found in the muscle belly, called muscle spindles, start to fire when too much stretch is applied to the muscle. This causes the muscle that is being stretched to actually contract in an attempt to shorten the muscle and protect it. This is where the shaking comes from and it is totally counterproductive to try and stretch a muscle that is contracting! If you reach that point, simply back off a bit until the shaking stops.
Opinions on stretch duration also vary considerably. As mentioned in the posterior compartment paragraph, stretching a muscle that is already fatigued and overworked can be harmful and lead to injury. Even if the muscle is not fatigued, holding a stretch for too long can be detrimental as well. When a stretch is applied for too long, the muscle tissue will start to fatigue while the tendon will have no problem taking the load. This is where you can set yourself up for a muscle strain right at the musculotendinous (muscle and tendon) junction where weak and fatigued muscle tissues meet strong tendinous tissues. So how long should you hold a stretch for? I personally like working with my breath. 3-5 proper full inhalations and exhalations is a good amount of time to hold a stretch for. But again, remember: there should be no pain, and don’t stretch fatigued muscles!
About the Author:
Matt is the Field Editor of the Journal of Mountain Hunting and plans, researches and coordinates a large portion of our Mountain Fitness and Mountain Life topics. His primary profession is as a Registered Massage Therapist (RMT), and he currently works as one of the lead therapists for Vancouver’s professional MLS team, Whitecaps FC.
Matt has completed 6 ultramarathons to date: three 50km races, two 50 mile races, and one 100km race. He is currently training for the Fat Dog 120 mile ultra in the North Cascade Mountains. Matt’s knowledge of what it requires to perform in the mountains is rooted in over 100 days a year in the field training for races, bagging peaks, fast packing, fishing and most importantly pursuing the game that call the mountains home.